As a website owner, selecting the right domain name is crucial for your brand’s identity and success. However, over time, you may find that your current domain no longer aligns with your site’s goals or direction. If you’re wondering how to change the domain name of a WordPress site, you’re not alone. Many users eventually decide to change WordPress domain name to better reflect their evolving business or content focus. Whether you’re looking to rebrand or simply update your URL. Understanding how to change domain name on WordPress is key.
Thankfully, you’re not obligated to stick with the same domain name forever. While changing your web address isn’t a decision to take lightly, there are many legitimate reasons why you may need to migrate your WordPress website to a new one.
In this guide, we’ll walk you through the process of changing your WordPress domain. Ensuring a smooth transition while avoiding any SEO setbacks. We’ll show you how to change your site’s domain name in four easy steps. We’ll also take steps to preserve all your hard-won backlinks and search engine rankings. Let’s get started!
Understanding Domain Names (And Why You Might Want to Change Yours)

A domain name is an address that people type into their browsers when they want to visit your website. This means that your domain name is strongly tied to your site’s identity.
Ideally, you’ll choose a domain name once, and stick with it forever. However, there are some scenarios where you may need to change your web address. You may decide to rebrand your website or company, and want to break away from your old domain. Or, you may also be expanding your business into new areas, and want your branding to reflect this diversification.
There’s also a chance that you may be happy with your domain name – but your target audience isn’t so keen. For example, people may complain that your domain name is hard to spell, or that it’s too similar to a competing brand you were unaware of at the time you launched your website. The customer is always right, so even if you’re happy with your domain name, you may want to consider a change if it promises to improve your site’s User Experience (UX).
While you should always choose your domain name carefully, there’s a chance that your dream domain wasn’t available at the time you launched your website. If your ideal address suddenly becomes available, you may decide to seize the opportunity.
Do You Need a New Domain Name When Changing Your WordPress Site’s Address?
When you’re ready to change WordPress domain name. One of the first steps in the process is deciding whether to purchase a new domain name. This is crucial to ensure a smooth transition and maintain your website’s brand integrity. Here’s a comprehensive guide to help you navigate this process effectively.
Steps to Acquire a New Domain for Your WordPress Site
-
Reserve Your New Domain: The first step in how to change the domain name of a WordPress site is selecting a new domain. And reserving it through a reliable registrar. Such as GoDaddy or Namecheap. Typically, a domain name costs under $20 per year.
-
Manage Both Domains Temporarily: If you’re still under contract with your old domain. You may need to manage both your old and new domains for a period. It’s generally recommended to maintain both for at least six months. To ensure your audience transitions smoothly to the new domain name on WordPress. This step is especially important. As some visitors may still access your original site.
-
Redirect Traffic: To maintain SEO value and direct traffic seamlessly. You need to implement a 301 redirect from your old domain to your new one. This not only guides visitors to your new WordPress site. Also helps preserve your search engine rankings during the transition.
Additional Considerations for Changing Your Domain Name
-
Update Your Information: When you change WordPress domain name. Be sure to update all your business materials. Including social media profiles, business cards, and email signatures. This ensures that your new domain is consistent across all platforms and materials. Providing a cohesive brand experience.
-
Cancel the Original Domain: Once the WordPress domain name change is complete and your visitors are accustomed to the new address. You can cancel the old domain to avoid unnecessary costs.
In conclusion, changing your WordPress domain is a significant decision. It requires careful planning. By acquiring a new domain, setting up 301 redirects, and updating your business materials. You can ensure a smooth transition. For both your audience and your search engine rankings.
How to Change Your WordPress Site’s Domain Name (In 4 Steps)
Moving your website isn’t a decision to take lightly. However, once you’ve made your decision you’ll want to ensure the transition goes off without a hitch. Here’s a straightforward, four-step plan for changing your website’s domain name.
Note that for the purposes of this postA post is a type of content in WordPress, a popular open-source content management system used for creating an... More, we’ll assume you’ve already registered your new domain and that it’s ready for your site.
Step 1: Back Up Your WordPress Website
Before you change your website’s domain name, we recommend creating a backup. This ensures you have something to restore if you encounter any issues with the migration.
You can create a backup using the UpdraftPlus pluginA plugin is a software component that adds specific features and functionality to your WordPress website. Esse... More. After activating it, you’ll need to configure where you want to store your backups. If you don’t choose a remote storage option, your UpdraftPlus backups will remain on your web-server. This isn’t recommended, as if your web-server goes down you’ll lose both your website and all of your backups.
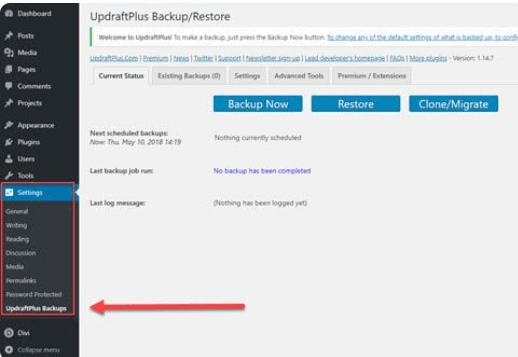
To choose a remote storage option, navigate to Settings > UpdraftPlus Backups. Then, select the Settings tab:
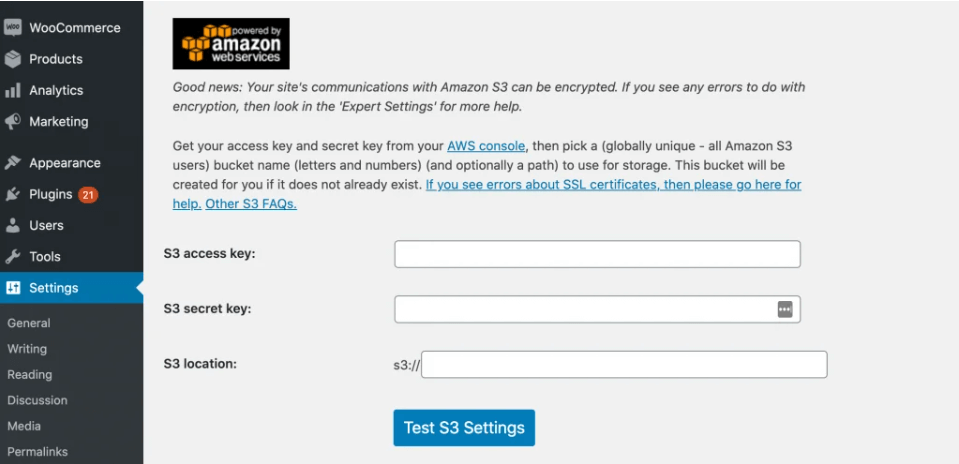
You can now choose a remote storage location, such as DropBox, Google Drive, or Microsoft OneDrive. UpdraftPlus also offers its own UpdraftVault storage option. Depending on your storage location, you may need to perform some additional configuration:
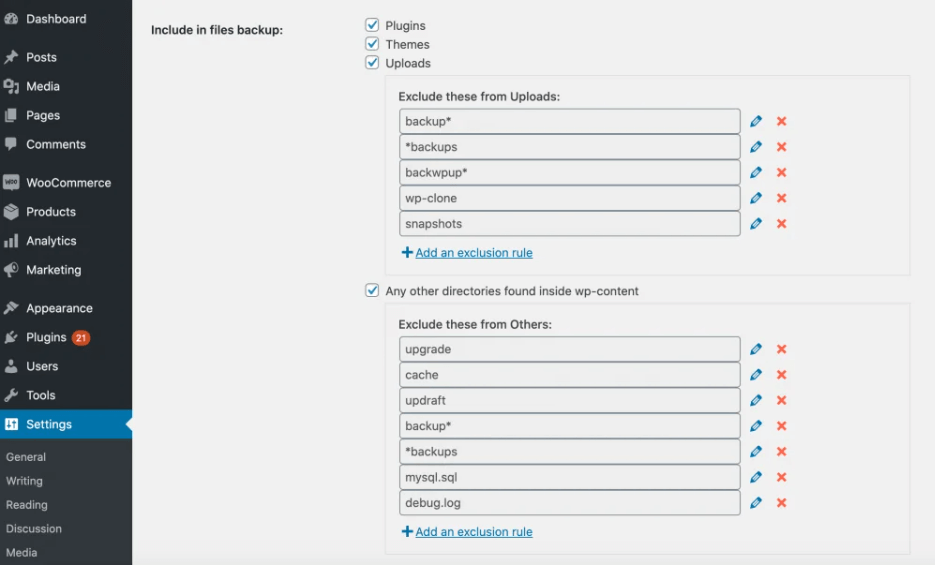
Next, choose the files that you want to include in your backups. When you’re happy with your configuration, click on Save Changes:
You can now generate a backup manually by navigating to Settings > UpdraftPlus Backups > Backup / Restore. Select Backup Now, and UpdraftPlus will create your backup.
How to Change the Domain Name of a WordPress Site: Essential FTP Credentials and Steps
If you’re looking to change your WordPress domain name. Understanding the process of logging in via FTP is a crucial step. Here’s a breakdown of the essential FTP credentials you need to gather when changing the domain name on WordPress:
Essential FTP Credentials for WordPress Domain Change
When you change the domain name of a WordPress site, you’ll need the following FTP credentials to access your server files:
-
FTP Hostname: This is the address of your server where your website files are stored. Your hosting provider typically supplies this information, formatted like ftp.yourdomain.com or an IP addressAn IP Address (Internet Protocol Address) is a unique numerical identifier assigned to every device connected ... More.
-
Username: Assigned by your hosting provider, this is the user ID needed to access your server. You can find this in your hosting account settings.
-
Password: This is the secure key linked to your username. Be sure to have this password for server access. If you forget it, most hosting dashboards allow you to reset it easily.
-
Port Number: This number specifies the port your server uses for FTP connections, commonly port 21. Your hosting provider will inform you if a different port is used.
-
FTP Client: While not a credential, having a reliable FTP client like FileZilla or Cyberduck is essential for connecting to your server. These clients need the above credentials to establish a connection.
How to Change Domain Name on WordPress: Locating FTP Credentials
To change WordPress domain, you’ll need to locate these credentials. Usually found within your hosting provider’s control panel. If you’re unsure where to find them, consult your hosting provider’s documentation. Do not hesitate to reach out to their support team for guidance.
Having these FTP credentials ready ensures a smooth transition when you change the domain name of your WordPress site. By following these steps and gathering the right information. You can confidently proceed with updating your WordPress domain name.
Step 2: Change Your Domain Name in Your WordPress Settings
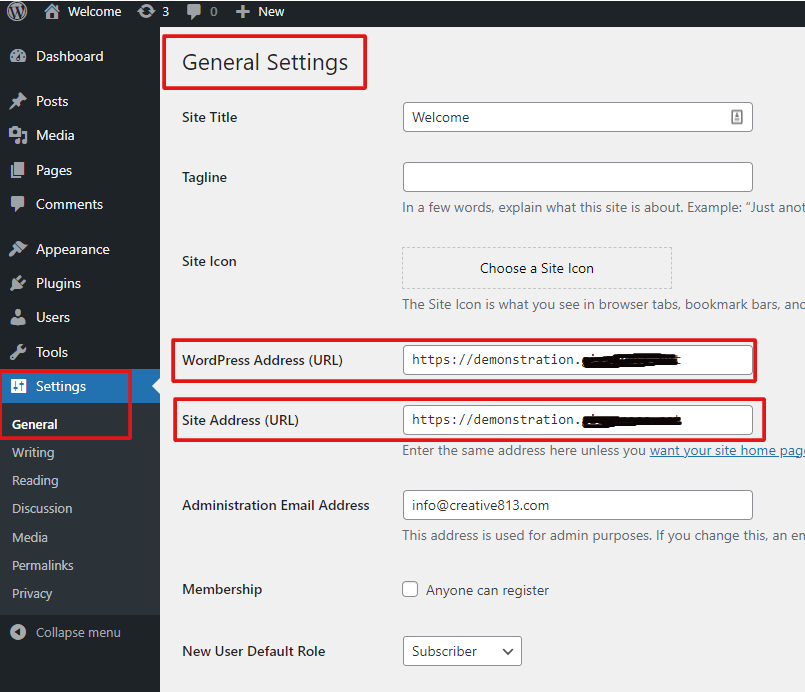
Now you’ll need to physically change your site’s address within the WordPress dashboardIn WordPress, the Dashboard is a central hub for managing a website's content and settings. It is the first sc... More by navigating to Settings > General. Just be aware that as soon as you make this change, you’ll be unable to access your WordPress dashboard until you’ve completed the migration:
You can now change the WordPress Address (URL) and Site Address (URL) to your new address, and save your changes. If WordPress isn’t giving you the option to edit WordPress Address (URL) and Site Address (URL), this means your domain name is hardcoded into your site’s wp-config.php file.
If these values are hardcoded, you’ll need to connect to your server using a File Transfer Protocol (FTP) client such as FileZilla. Then, navigate to wp-config.php and open it for editing. Find the line that reads, That's all, stop editing! Happy publishing, and add the following directly above it:
define( 'WP_HOME', 'https://example.com' );
define( 'WP_SITEURL', 'https://example.com' );
Make sure to replace www.example.com with your new domain. Your website will now be available at your new address.
Step 3: Preserve Your Backlinks With Redirects
At this point, you’ve successfully changed your domain. However, there may be a significant number of third-party links that point to your old address. To ensure you don’t lose out on any traffic, it’s vital you redirect these outdated links to your new domain. This can also help preserve your Search Engine Optimization (SEO).
You can implement a redirect by editing your site’s .htaccess file. This is a configuration file that tells your server how to handle various requests. After connecting to your site using your FTP client, open your .htaccess file and add the following:
#Options +FollowSymLinks
RewriteEngine on
RewriteRule ^(.*)$ http://www.example.COM/$1 [R=301,L]
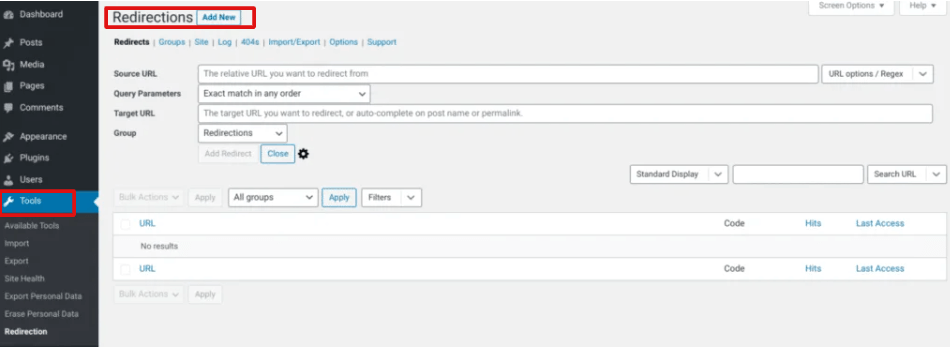
Make sure to replace www.example.com with the URL that you want to use in your redirect. Alternatively, you can create redirects using the Redirection plugin. After activating it, navigate to Tools > Redirection > Add New.
In the Source URL field, enter your old link. Then, specify the new link in the Target URL field:
To make this redirect live, click on Add redirect. Now, anyone who tries to access this URL will be redirected to your new one automatically.
Step 4: Notify Google About Your Change of Address
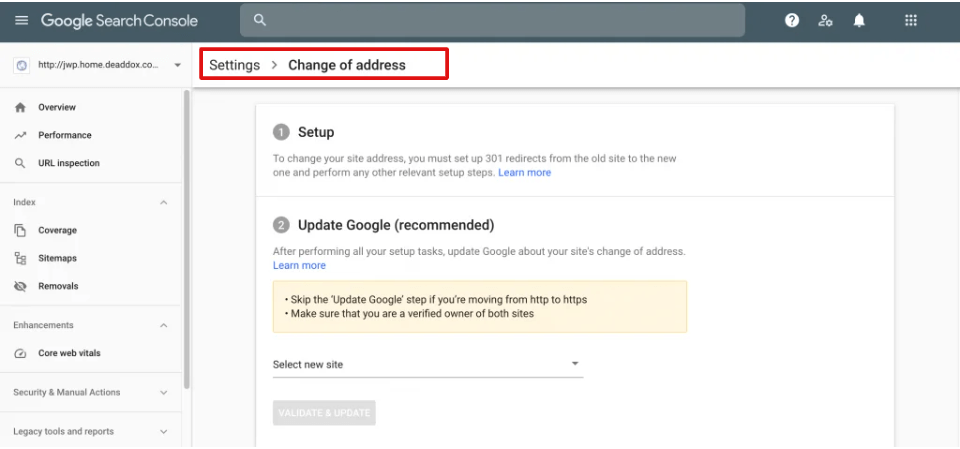
Moving to a new domain can damage your SEO, as you lose all of the authority you built with your old address. To ensure you continue to rank for relevant search terms, it’s wise to inform Google about your recent change.
The search engine giant will then prioritize crawling and indexing your new domain over your old domain. This will help it migrate your search results to your new address. You can make this change using Google’s Change of Address tool in Search Console:
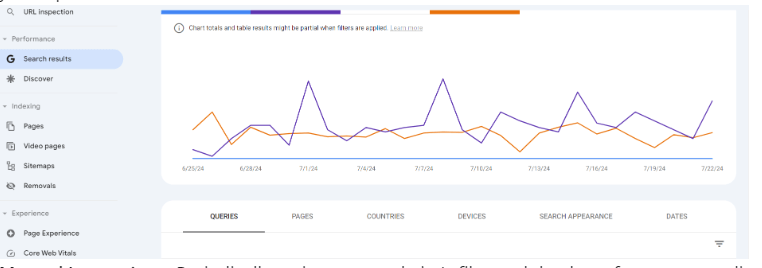
Once you’ve completed the necessary steps, Google will start processing your request. According to Google, this should take around 180 days. During this time, it may help to monitor your search queries. As more pagesIn WordPress, a page is a content type that is used to create non-dynamic pages on a website. Pages are typica... More of your new site are indexed and start ranking, the URLs on the new domain should start receiving search impressions and clicks:
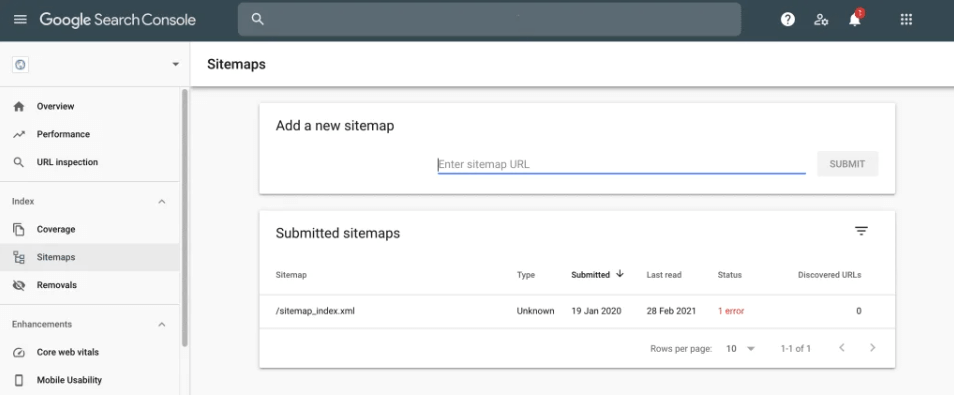
You may also want to monitor Search Console’s sitemaps for your new and old domain names. Initially, the sitemap containing the new URLs will have zero indexed pages. As Google processes your change request, the number of pages indexed for your new sitemap should increase:
Even after Google completes the change request, it’s recommended that you continue to pay for your old domain name for at least a year. This will prevent third parties from purchasing your old domain and using it for malicious purposes while it’s still receiving a significant amount of traffic.
Conclusion
Changing your website’s domain name can be a daunting task. However, by taking the right precautions you can move to an entirely new web address without sacrificing your existing backlinks, traffic, and search engine rankings.
In this article, we shared a step-by-step plan for changing your website’s domain name:
- Back up your WordPress website using a plugin such as UpdraftPlus.
- Change your URLs in your WordPress settings.
- Preserve your backlinks with redirects, either by editing your
.htaccessfile or using the Redirection plugin. - Notify Google about your change of address.
Do you have any questions about changing your WordPress website’s domain name? Feel free to share them in the commentsComments are a feature of WordPress that allow users to engage in discussions about the content of a website. ... More below!
If you’re ready to change your WordPress domain name and need fast, reliable WordPress hosting with hassle-free updates, explore our hosting packages designed for seamless transitions. Click the button below to get started today!


