Speed is paramount to your site’s success. It has an impact on where your pagesIn WordPress, a page is a content type that is used to create non-dynamic pages on a website. Pages are typica... More land in search results and whether your site’s visitors have a good experience. Browser Caching In WordPress Every second matters, so you’ll want to find ways to improve your loading times.
Browser caching is one strategy you can use. It enables you to deliver content faster by storing copies of it in users’ browsers. Plus, it’s super easy to implement!
In this postA post is a type of content in WordPress, a popular open-source content management system used for creating an... More, we’ll show you how browser caching works and why it’s important. Then, we’ll look at some plugins that can help you enable it in WordPress. Let’s get to it!
- What Is Browser Caching In WordPress and Why Is It Important?
- What Are Some Possible Reasons For Not Seeing Performance Improvements After Implementing Browser Caching?
- What Are The Considerations to Keep In Mind Before Installing A Caching Plugin On Your Website?
- How Can You Configure Caching Settings Using Different Caching Plugins?
- How to Leverage Browser Caching in WordPress (4 Plugins)
- Optimizing Cache Headers for Faster Websites: Nginx vs. Apache
- How Can Third-party Scripts Impact Website Performance In Relation To Browser Caching?
- How Can You Optimize Your Website’s Performance By Enabling Browser Caching And Other Speed Optimization Techniques?
- How can I use WP-Rocket as an alternative method to leverage browser caching for Google Analytics?
- What Should You Do If Your Website’s Load Time Isn’t Improving After Implementing Browser Caching?
- What Are Some Tips For Fixing The Leverage Browser Caching Warning In Google PageSpeed Insights?
- How Can I Minimize The Use Of Third-party Scripts To Improve Google PageSpeed Insights Score?
- How Can I Host My Analytics Script Locally Using The CAOS WordPress Plugin?
- How to Leverage Browser Caching in WordPress by Editing Server Files?
- What Are The Benefits Of Using Caching Plugins for WordPress Websites?
- Conclusion
What Is Browser Caching In WordPress and Why Is It Important?
To truly optimize your WordPress site’s performance, leveraging browser caching is paramount. Browser caching allows browsers to store elements of your webpages locally, reducing load times and enhancing user experience. Let’s delve into how you can implement effective browser caching strategies using Cache-Control and Expires headers. Before we look at how to implement browser caching, it’s important to understand how caching in general works.
Understanding Browser Caching
Before diving into implementation, it’s crucial to grasp the concept of browser caching. Browser caching involves storing website data temporarily on a user’s device. This temporary storage is governed by HTTP headers such as Cache-Control and Expires. These headers dictate how long the browser should retain cached resources before fetching them anew from the server.
Caching is the process of storing information in a temporary location so it can be called upon more efficiently. On the web, this can happen where the site is hosted (server-side) or on the user’s end (client-side).
Browser caching is a common type of client-side caching. It enables a user’s browser to store parts of a page locally. This way, your site will load more quickly the next time they visit it, because their browsers have to make fewer HTTP requests to the server to load the page.
Implementing Browser Caching Strategies
Cache-Control Header
The Cache-Control header is instrumental in managing caching directives. It offers precise control over how resources are cached and for how long. By setting directives like max-age and public, you can specify caching durations and whether resources can be cached publicly.
Expires Header
Although Cache-Control is more commonly used, the Expires header remains relevant for certain scenarios. It specifies an exact expiration date for cached resources, ensuring compatibility with older HTTP/1.0 caches.
Benefits of Effective Browser Caching
Implementing robust browser caching strategies yields several benefits:
- Improved Page Load Speed: Reduced server load and fewer HTTP requests lead to faster page loading times.
- Enhanced User Experience: Visitors experience quicker page responsiveness and smoother navigation.
- SEO Advantages: Faster loading times contribute positively to SEO metrics like the First Contentful Paint (FCP), which can improve your site’s search engine rankings.
This also helps improve your First Contentful Paint (FCP) score. The FCP metric measures how long it takes the browser to load the first element of your page. It’s one factor Google considers in its assessment of your site.
Speed metrics like FCP play a big role in your site’s Search Engine Optimization (SEO). Using techniques like browser caching to optimize for speed is vital to your page rank. It also contributes to a better overall user experience for your site’s visitors.
You can find out how well your site is optimized for speed with Google’s PageSpeed Insights tool:

Regardless of your speed score, you’ll want to implement browser caching on your site to boost its performance. Fortunately, this is quite easy to do.
How to Implement Browser Caching in WordPress
For WordPress users, leveraging plugins such as W3 Total Cache simplifies the implementation of browser caching strategies. Plugins like these enable you to configure Cache-Control and Expires headers effortlessly, optimizing your site’s performance with minimal effort.
Incorporating Cache-Control and Expires headers into your browser caching strategy is not just about technical optimization—it’s about enhancing user experience and boosting SEO performance. By ensuring your WordPress site utilizes effective browser caching, you pave the way for faster loading times and happier visitors. Take advantage of these strategies to optimize your site today.
What Are Some Possible Reasons For Not Seeing Performance Improvements After Implementing Browser Caching?
When browser caching doesn’t improve your website’s performance, several factors could be causing the issue. One common problem is the configuration of your cache settings. Ensuring your cache expiration settings are correctly extended is essential to maximize the benefits for static resources, such as large images.
Another major factor to consider is the impact of third-party scripts. Tools like customer relationship management (CRM) software, analytics suites, and other embedded plugins often add external scripts to your web pages. These scripts are hosted externally, meaning you can’t directly control their caching. As a result, these can significantly slow down page load times because each visit may require re-fetching these scripts.
To address this, evaluate which third-party services are essential and consider removing non-critical ones. Reducing the number of integrations can lead to substantial performance improvements by decreasing the load time caused by these scripts.
What Are The Considerations to Keep In Mind Before Installing A Caching Plugin On Your Website?
Before installing a caching pluginA plugin is a software component that adds specific features and functionality to your WordPress website. Esse... More on your website, consider factors like compatibility with your WordPress themeA WordPress theme is a set of files that determine the design and layout of a website. It controls everything ... More and plugins, ease of use, support for browser caching and server-side caching, and whether the plugin offers features like CDN integration and cache preloading. Additionally, ensure that the plugin is actively maintained and regularly updated to address security and performance concerns.
When adding a caching plugin to boost your website’s performance, consider these key factors:
- Verify with Your Web Host:
- Hosting Policies: Check if your web hosting service supports caching plugins, especially if you use managed WordPress hosting.
- Pre-Configured Features: Some managed hosts already have caching mechanisms like browser caching in place, making additional plugins unnecessary.
- Ensure Plugin Compatibility:
- Hosting Environment: Make sure the plugin is compatible with your host, as well as with your current plugins and themes to avoid downtime and functionality issues.
- Consult Support Teams:
- Custom Recommendations: Your hosting provider can suggest the best caching practices tailored to your site.
- Technical Support: Contacting support ensures you can quickly resolve any issues during or after plugin installation.

By keeping these considerations in mind, you can effectively enhance your website’s performance with a caching plugin while maintaining optimal operations and SEO benefits.
How Can You Configure Caching Settings Using Different Caching Plugins?
Configuring caching settings using different caching plugins involves accessing the plugin’s settings within your WordPress dashboardIn WordPress, the Dashboard is a central hub for managing a website's content and settings. It is the first sc... More and adjusting options such as cache expiration times, cache types (e.g., page caching, object caching), cache purging mechanisms, and integration with CDN services if applicable. Each caching plugin may have a slightly different interface and terminology, but the overall process remains similar.
Boosting your WordPress site’s speed is essential for better user experience. Configuring caching settings can significantly enhance load times and overall performance. Here’s a simple guide on how to set up caching with popular plugins.
1. Choose the Right Caching Plugin
Before installing a caching plugin, consult your hosting provider. They may have recommendations or restrictions, and some hosts offer built-in caching solutions that could make additional plugins unnecessary.
2. Install and Activate the Plugin
Once you have chosen a compatible plugin, follow these steps:
- Download the plugin from the WordPress plugin repository or purchase it from the developer’s site.
- Install the plugin via your WordPress dashboard under ‘Plugins’ > ‘Add New’ > ‘Upload Plugin’.
- Activate the plugin after installation.

3. Configure Caching Settings
Most caching plugins offer similar basic settings:
- Browser Caching: Stores static elements (like CSS, JavaScript, and images) in the visitor’s browser to reduce load times on repeat visits.
- Page Caching: Saves static HTML versions of your pages to speed up delivery by avoiding repeated PHP processing.
- Object Caching: Stores the results of common databaseA database is an organized collection of data stored and accessed electronically. It is a crucial component of... More queries for faster reuse.
4. Test Your Setup
After configuring the caching settings, test your site to ensure everything is working correctly. Use tools like Google PageSpeed Insights to check your website’s loading speed and observe improvements. Adjust settings as needed for optimal performance.
By following these steps, you can effectively use caching plugins to enhance your WordPress site’s performance. Remember to ensure compatibility with your hosting environment and tailor the settings to your specific site needs.
How to Leverage Browser Caching in WordPress (4 Plugins)
Now that we’ve gone over what browser caching is and why it’s important, let’s check out four plugins that can help you implement it.
1. W3 Total Cache
W3 Total Cache is a freemium plugin that offers browser caching out of the box. It uses cache control to manage browsers’ behavior when they return to your website. You can set parameters for how long and under which conditions a browser can cache data.
Browser caching is on by default, and several cache-control settings will automatically be applied. Beyond that, W3 Total Cache gives you granular control over what browsers can and can’t do when caching.
Once you install the plugin on your site, you can go to Performance > Browser Cache to find a global settings menu. Below it, you’ll see menusIn WordPress, a menu is a collection of links that are displayed as a navigation menu on a website. Menus are ... More for different types of code and files:
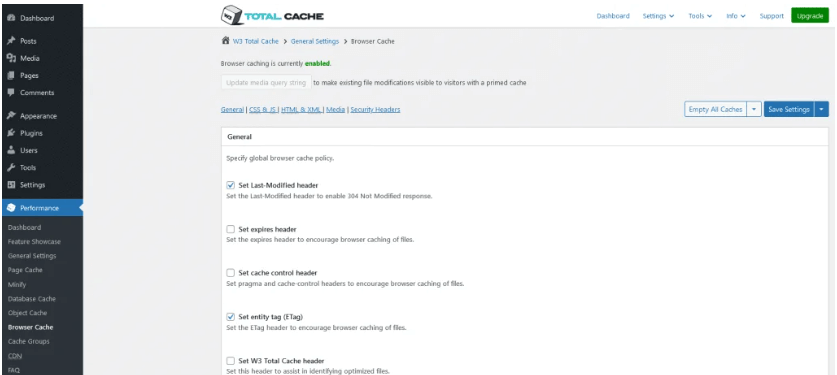
The plugin works with shared, VPS, and dedicated hosting. Its free version comes with a wealth of tools to further optimize your site’s speed, including server-side caching, minification, and the ability to convert images to the modern WebP format.
2. WP Fastest Cache

WP Fastest Cache is a freemium tool that offers browser caching and other speed-enhancing features. Browser caching won’t be on when the plugin is first activated, but you can easily enable it from the plugin’s main menu:
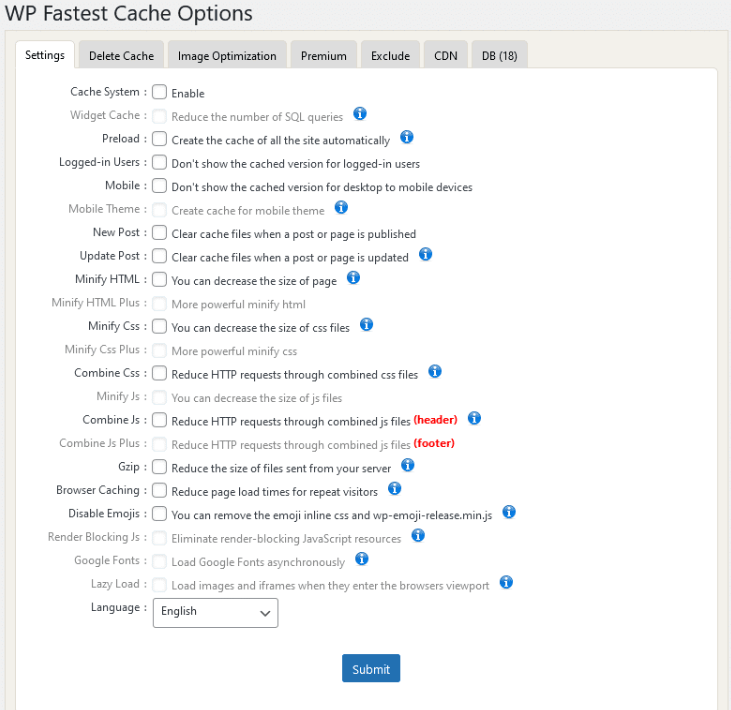
You don’t get much control over browser caching with this tool, which is likely fine for most users.
However, you do get minification of your HTML and CSS code on the free version of the plugin, which can play an important role in your site’s overall loading times. It removes the extra characters, lines, and commentsComments are a feature of WordPress that allow users to engage in discussions about the content of a website. ... More from your code, reducing its size and enabling it to be loaded faster.
3. Browser Caching In WordPress: WP Super Cache
WP Super Cache is a plugin by Automattic, the company that owns WordPress.com, WooCommerce, and Tumblr. It offers browser caching in addition to its main caching features, but it’ll be off by default.
To enable it, you’ll need to go to Settings > WP Super Cache > Advanced. In the miscellaneous section, look for an option called 304 browser caching and toggle it on:
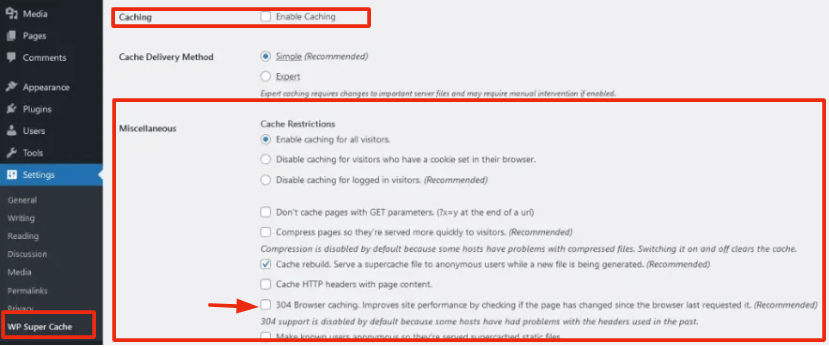
Again, you don’t get many configuration settings with this plugin. In fact, WP Super Cache’s main feature is server-side caching. It substitutes static HTML files for the burdensome PHP scripts your site normally needs when a browser makes a server request. This leads to faster load times.
4. Hummingbird
Hummingbird was developed by the same people behind the popular image optimization plugin Smush. This all-round caching plugin guides you through a setup wizard when you activate it. You won’t see options for browser caching, though, as it’ll be on by default.
However, some cache expiry periods may not meet Google’s recommended period of one year. If you want to bring them in line, you’ll need to configure your browser caching settings by making changes to your .htaccess file, which you can do using an File Transfer Protocol (FTP) client, or the File Manager in your hosting account.
Hummingbird will generate the code for you to copy and paste:
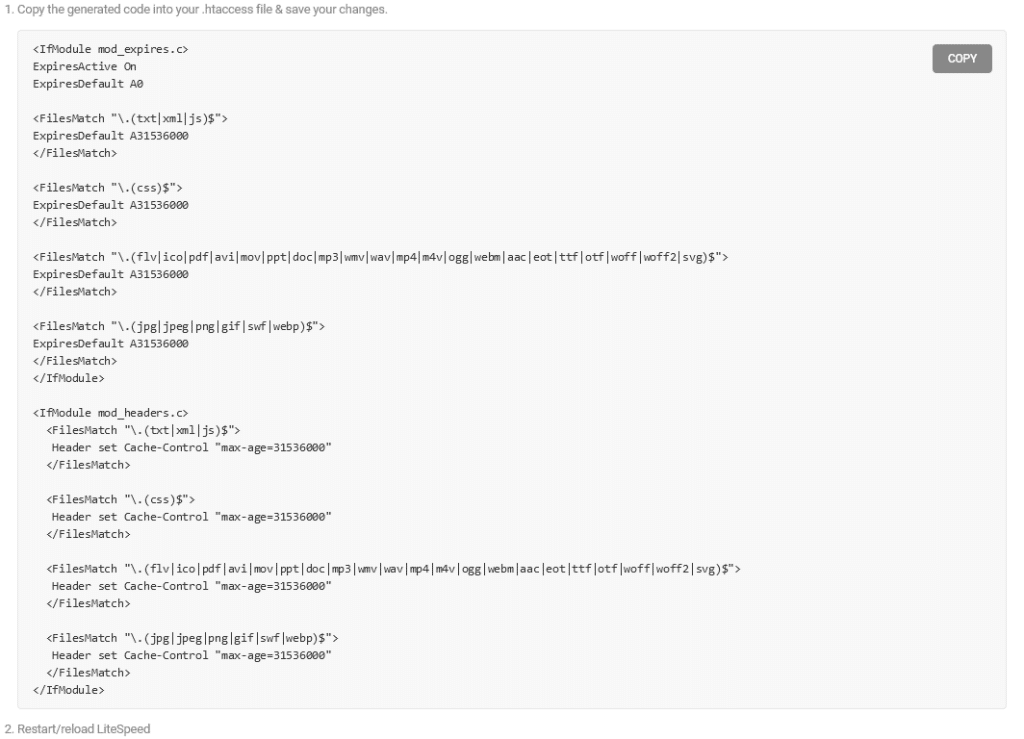
Along with browser caching, Hummingbird offers a lot of features to help with load times, including integration with Smush. Like browser caching, image optimization can make a significant difference to your site’s speed by reducing the size of your media files.
The Easy Button: Using Plugins for a Speed Boost
The good news is you don’t need to be a tech whiz to use these techniques. Many WordPress plugins, like WP Fastest Cache, WP Rocket, Hummingbird, and W3 Total Cache, can handle all of this for you. These plugins offer user-friendly interfaces to configure browser caching, GZIP compression, preloading, and even lazy loading images – all in one place!
Optimizing Cache Headers for Faster Websites: Nginx vs. Apache
When it comes to speeding up websites, optimizing cache headers plays a crucial role. Nginx and Apache are two popular web servers, each with its methods for setting cache headers. Let’s explore how to do it for both:
How do you set Expires headers in an Nginx server?
Setting Expires headers in Nginx involves configuring the expires directive in the server or location block of your Nginx configuration file. Here’s how to do it:
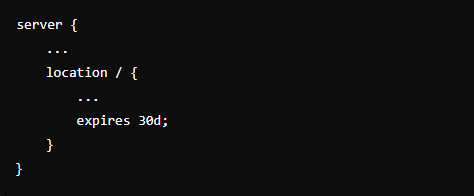
In this example, expires 30d; tells Nginx to set the Expires header to 30 days for all resources in the specified location.
How do you set Cache-Control headers in an Nginx server?
To set Cache-Control headers in Nginx, you can use the add_header directive in the server or location block of your configuration file. Here’s an example:
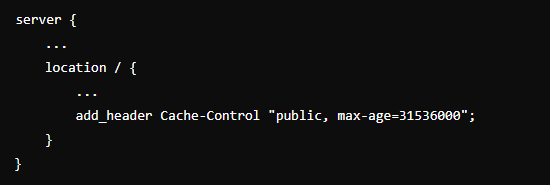
This configuration tells Nginx to add the Cache-Control header with a max-age of one year for all resources in the specified location.
How do you set Expires headers in an Apache server?
In Apache, setting Expires headers involves using the mod_expires module. You can add directives to your .htaccess file or Apache configuration file to control caching behavior. Here’s how:

In this example, ExpiresDefault “access plus 30 days” tells Apache to set the Expires header to 30 days for all resources unless otherwise specified.
By configuring cache headers effectively, you can improve website performance and user experience, regardless of whether you’re using Nginx or Apache as your web server.
How Can Third-party Scripts Impact Website Performance In Relation To Browser Caching?
Optimizing your website’s loading speed is crucial for providing a great user experience, and browser caching plays a significant role in this process. However, third-party scripts can significantly affect caching efficiency and overall site performance. These scripts, sourced from external providers like analytics tools, advertising networks, and CRM systems, can influence how quickly your pages load.
How Do Third-Party Scripts Affect Caching?
- Non-Cacheable Content: Third-party scripts are served from external servers, meaning you can’t control their caching settings. If these scripts aren’t optimized for caching, browsers must request them anew with each page load, slowing down your site.
- Frequent Changes: External providers often update their scripts without notifying you. Frequent changes prevent browsers from caching these scripts long-term, forcing them to download new versions on each visit.
- Increased HTTP Requests: Each additional third-party script requires a separate HTTP request. More requests can lead to longer load times, especially if these resources load synchronously.
Strategies to Mitigate Negative Impacts
- Audit and Evaluate: Regularly review all third-party scripts on your website. Assess whether each tool is essential and weigh the performance impact against the benefits it provides.
- Limit Use: Minimize the number of third-party scripts. Only use tools that are crucial for your business operations or significantly enhance user experience.
- Asynchronous Loading: Configure scripts to load asynchronously when possible. Asynchronous loading ensures that scripts do not block the rendering of other page elements, improving the perceived load time for users.
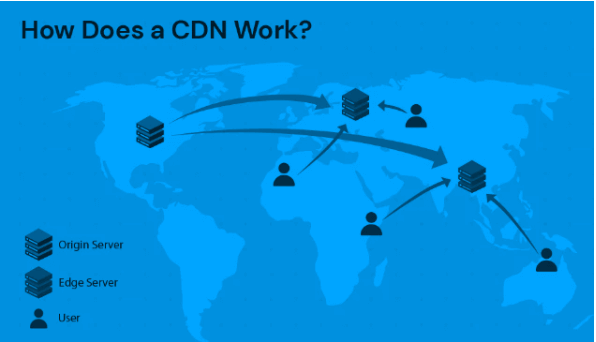
- Use a Content Delivery Network (CDN): Serve third-party scripts through a CDN to reduce latency by delivering content from servers closer to the user.
By understanding and managing the impact of third-party scripts on browser caching, you can significantly enhance your website’s performance and provide a smoother, faster experience for your users.
How Can You Optimize Your Website’s Performance By Enabling Browser Caching And Other Speed Optimization Techniques?
One powerful method is to activate browser caching and combine it with other optimization tricks. By doing this, your site can load faster, giving visitors a smoother experience and potentially boosting your website rankings.
- What other optimization techniques can be integrated with browser caching to enhance website performance?
Beyond browser caching, use GZIP compression to shrink file sizes, preload assets to speed up load times, and lazy load images to prioritize visible content. These techniques can be seamlessly integrated through caching plugins for a robust optimization strategy. - How do you configure these plugins to enable browser caching?
To enable browser caching with plugins, go to the plugin’s settings, select the server type, and set expiry times for cached files. You can apply these settings to all files or customize them for specific file types based on your needs. - What are some specific plugins that can be used for enabling browser caching and what additional features do they offer?
Top plugins for browser caching include WP Rocket, Hummingbird, and W3 Total Cache. WP Rocket also provides GZIP compression, asset preloading, and lazy loading. Hummingbird supports various caching forms, while W3 Total Cache offers web page caching, code minification, lazy loading images, and CDN integration. - How can someone implement browser caching if they are not comfortable editing server files directly?
If you’re not comfortable editing server files, use WordPress caching plugins. These plugins handle the technical details and offer an easy-to-use interface for setting up and managing caching. - What specific types of content are best suited for caching?
Static content, like images, is perfect for caching. Once loaded, they don’t need to be fetched again, speeding up your site for repeat visitors.
How can I use WP-Rocket as an alternative method to leverage browser caching for Google Analytics?
Utilizing WP-Rocket presents an effective solution to leverage browser caching specifically for Google Analytics on your WordPress site. This method streamlines integration and enhances loading times. Here’s how you can implement this approach:
Implementing WP-Rocket for Google Analytics Browser Caching
- Install WP-Rocket Plugin: Begin by installing the WP-Rocket plugin on your WordPress site. This premium plugin is renowned for its ability to optimize website performance, including browser caching functionalities.
- Navigate to WP-Rocket Settings: After installation, navigate to the WP-Rocket settings in your WordPress dashboard. Look for the ‘Add-ons’ tab within WP-Rocket’s settings menu.
- Enable Google Tracking Add-on: Within the ‘Add-ons’ tab, locate the Google Tracking add-on. Enable this feature to leverage browser caching for your Google Analytics script. WP-Rocket will then host the Google Analytics script locally on your server.

Benefits of Using WP-Rocket for Google Analytics
- Improved Loading Times: Hosting Google Analytics locally allows browsers to cache the script, reducing load times for repeat visits.
- Compatibility: WP-Rocket integrates seamlessly with other plugins, ensuring that your website’s performance optimizations work harmoniously.
- User Experience Enhancement: Faster loading times contribute to a smoother browsing experience, enhancing user satisfaction and engagement.
Considerations for WP-Rocket
- Premium Service: WP-Rocket offers various licensing options starting at $49 per year. This investment provides robust performance enhancements, making it worthwhile for optimizing your WordPress site.
By leveraging WP-Rocket’s capabilities to host Google Analytics locally and utilize browser caching effectively, you can significantly enhance your website’s performance metrics. Implement this strategy to streamline your site’s loading times and improve overall user experience today.
What to Cache: Your Website’s “Staples”
Think of website content like groceries. Fresh food needs to be downloaded each time, but pantry staples like images are perfect for caching. By caching static content (images, scripts, etc.) that doesn’t change frequently, you ensure visitors only download them once, leading to a much faster experience on future visits.
So, unleash the power of browser caching and other optimization techniques! With these website speed secrets, you’ll have visitors saying “Wow, this website is fast!” in no time.
What Should You Do If Your Website’s Load Time Isn’t Improving After Implementing Browser Caching?
If your website’s load time remains sluggish even after optimizing browser caching, it’s crucial to explore other factors affecting performance. Here’s a concise plan:
- Review Cache Settings: Check and adjust cache expiry periods, especially for large static elements like images, to optimize loading times.
- Audit Third-Party Scripts: External scripts from tools like CRMs and plugins can slow down your site. Use tools like Google’s PageSpeed Insights to analyze their impact.
- Analyze and Prioritize: Evaluate the effect of third-party scripts on your site’s performance using PageSpeed Insights or similar tools.
- Reduce and Replace: Trim down unnecessary third-party tools or switch to faster alternatives to alleviate the load on your website.
By addressing both caching and external scripts, you can significantly enhance your website’s speed and overall performance.
What Are Some Tips For Fixing The Leverage Browser Caching Warning In Google PageSpeed Insights?
To optimize your WordPress site and address the leverage browser caching warning in Google PageSpeed Insights, follow these expert strategies:

Implement Cache-Control or Expires Headers
Integrate Cache-Control or Expires HTTP headers into your server responses. These headers dictate how long browsers and shared caches should retain your website’s files. By specifying caching durations, you improve retrieval speed for returning visitors.
Optimize Caching for Google Analytics
Google Analytics scripts are pervasive but can slow down your site if not cached effectively. Customize your browser caching settings to include these scripts. You can modify your .htaccess file or use plugins like W3 Total Cache to manage this process efficiently, minimizing script downloads and enhancing site performance.
Streamline Third-Party Scripts
Evaluate and streamline the usage of third-party scripts on your site. Each additional script, especially from external sources, can impact load times significantly. Reduce unnecessary scripts and optimize those that are essential for minimal interference with page loading speed.
By focusing on these strategies, you can effectively mitigate the leverage browser caching warning highlighted by Google PageSpeed Insights. This proactive approach not only improves your speed scores but also enhances the overall browsing experience for your visitors. Implement these tips today to optimize your WordPress site for maximum performance.
How Can I Minimize The Use Of Third-party Scripts To Improve Google PageSpeed Insights Score?
When aiming to enhance your Google PageSpeed Insights score, effectively managing third-party scripts is paramount. These scripts, crucial for site functionality and analytics, can inadvertently slow down page loading times if not handled strategically. Here’s how you can minimize their impact while optimizing performance:
Steps to Minimize Third-Party Scripts
1. Conduct a Comprehensive Script Audit
Initiate by conducting a thorough audit of all third-party scripts currently active on your WordPress site. Evaluate each script’s necessity and functionality. Removing unnecessary scripts can notably reduce load times and streamline performance.
2. Explore Local Hosting Options
For essential scripts, explore hosting them locally rather than relying on external servers. Local hosting grants you control over caching mechanisms, potentially speeding up script retrieval. Note, however, that certain scripts may require external hosting due to operational constraints.
3. Utilize Efficient Tools and Plugins
Leverage WordPress plugins designed to optimize script integration without compromising performance. Look for plugins capable of selectively disabling scripts on specific pages or deferring script loading until after the initial page load. Tools like W3 Total Cache can also aid in managing caching settings for improved efficiency.
4. Regular Maintenance and Updates
Ensure all scripts and associated plugins remain updated. Developers frequently enhance script efficiency through updates, contributing to improved overall performance. Regular maintenance safeguards your site against outdated functionalities that may impede speed optimizations.
By strategically managing third-party scripts on your WordPress site, you can significantly enhance both performance and your Google PageSpeed Insights score. Balancing script functionality with optimal page speed ensures a seamless user experience while meeting performance benchmarks. Implement these strategies today to unlock the full potential of your website’s speed and efficiency.
How Can I Host My Analytics Script Locally Using The CAOS WordPress Plugin?
Local hosting of your Google Analytics script can significantly enhance your WordPress site’s performance and provide greater control over data privacy. The Complete Analytics Optimization Suite (CAOS) WordPress plugin offers an efficient solution for achieving this. Here’s a detailed guide on how to utilize CAOS to host your analytics script locally:

Step-by-Step Guide to Using CAOS Plugin
- Install the CAOS Plugin:
- Navigate to your WordPress dashboard.
- Go to Plugins > Add New.
- Search for “Complete Analytics Optimization Suite” or “CAOS.”
- Install and activate the plugin.
- Configuration:
- After activation, find CAOS among your installed plugins.
- Click on ‘Settings’ or access CAOS from the sidebar menu.
- Enter Your Google Analytics Tracking ID: In the CAOS settings, input your Google Analytics Tracking ID.
- Download and Save the analytics.js File: CAOS automatically downloads the analytics.js file from Google and saves it to your server.
- Setup File Caching:
- Utilize wp_cron() to keep the analytics.js file updated.
- Configure caching parameters to optimize website performance effectively.
- Optimize Performance: Configure CAOS to load the tracking code in the website footer to minimize render-blocking resources, thereby improving page load speed.
- Compatibility Note: CAOS may conflict with other Google Analytics plugins. Consider deactivating them to ensure CAOS functions effectively.
Additional Benefits of Using CAOS
- Reduced HTTP Requests: Hosting analytics locally reduces external HTTP requests to Google, potentially speeding up your site.
- Control Over Caching: Maintain full control over the caching of the analytics.js file, further enhancing site performance and user experience.
By following these steps, you can effectively set up and enjoy the benefits of hosting your Google Analytics script locally with the CAOS plugin on your WordPress site. This method not only improves performance metrics but also enhances data privacy and control. Implement CAOS today to optimize your WordPress site for smoother, faster browsing experiences.
How to Leverage Browser Caching in WordPress by Editing Server Files?
Ever notice how some websites seem to fly when you visit them, while others take ages to load? Website speed is crucial these days, and one of the secret weapons for a speedy site is something called “browser caching.”
If you’re managing a WordPress site and have the knack for tinkering with server files, you’ve got a powerful tool at your disposal: browser caching. By tweaking settings directly, you can help browsers store your site’s data for quicker loading on return visits. Let’s dive into the steps:
1. Understanding Browser Caching
Imagine your website as a library. When visitors come in, their browsers can “remember” certain books (like images and stylesheets) and keep them handy for future visits. This means faster load times since the browser doesn’t need to fetch everything anew each time.
2. Making Changes to HTTP Headers
To activate browser caching, you’ll play with HTTP headers, which are like notes browsers read to understand how to handle your site’s files:
- Cache-Control: Sets rules for how long browsers should keep files and where to store them.
- Expires: Specifies when cached files expire, prompting the browser to grab fresh copies from the server.
3. Tweaking Server Configurations
- Apache: If you’re on an Apache server, you’ll head into the .htaccess file in your WordPress root. Inside, you’ll add lines like “ExpiresActive On” and “ExpiresByType” to set caching rules for different file types.
- Nginx: For Nginx servers, the game happens in the nginx.conf file. Within server blocks, you’ll add directives to dictate caching durations and behaviors.
Messing with server files to enable browser caching can turbocharge your site’s speed. But, tread carefully: a misstep could mess with how your content displays. Always back up your configurations, and keep an eye out for any hiccups in content delivery.
By mastering browser caching, you’re not just making your site faster; you’re also signaling to search engines that your site is user-friendly, potentially boosting your rankings.
What Are The Benefits Of Using Caching Plugins for WordPress Websites?
1. Are there practical steps or examples on how to implement Browser Caching In WordPress with these plugins?
Yes, there are practical steps for implementing browser caching via plugins. You can easily do it by picking the right plugin, tweaking settings to fit your site, and turning on caching. The process may vary based on the plugin you choose.
2. What additional work do caching plugins perform besides enabling browser caching?
Many caching plugins are multi-taskers! They not only enable browser caching but also offer additional superpowers for website speed optimization:
- File Shrinking: Plugins can compress your website’s files like zipping up a suitcase – smaller size means faster loading!
- Image Optimization: Some plugins work magic on your images, making them smaller and faster to load without sacrificing quality.
- Website Efficiency Boost: Think of it as website fitness training. Plugins can improve how your website runs overall, leading to a smoother experience for visitors.
3. How can non-technical users manage browser caching?
Not tech-savvy? No problem! With plugins, even non-techies can handle browser caching hassle-free. These tools take care of the nitty-gritty automatically, so you don’t have to mess with server files. Caching plugins are designed for everyone. They handle the technical stuff behind the scenes, allowing you to optimize your website’s speed with a few clicks. No need to edit server files directly – these plugins are your user-friendly speed champions!
Conclusion
Browser caching is worth considering if you’re trying to improve your site’s speed. It enables browsers to store data from your site so that they don’t have to request it from the server again on subsequent visits, thereby reducing loading times.
To recap, here are four plugins you can use to leverage browser caching in WordPress:
- W3 Total Cache: A freemium tool that offers advanced caching settings.
- WP Fastest Cache: This caching plugin offers a variety of speed-enhancing features.
- WP Super Cache: It offers both server-side and client-side caching.
- Hummingbird: A freemium tool that integrates with the image optimization plugin Smush.
Do you have any questions about how to leverage browser caching in WordPress? Let us know in the comments section below!
If you’re looking for fast wordpress hosting as well as done-for-you updates such as Browser Caching In WordPress, check out our hosting packages by clicking the button below:

