Are you facing compatibility issues or experiencing glitches with the latest WordPress version? In this comprehensive guide, we’ll delve into the process of how to Downgrade WordPress Version, providing you with step-by-step instructions to seamlessly revert to an older version and ensure smooth operation for your website. Whether it’s pluginA plugin is a software component that adds specific features and functionality to your WordPress website. Esse... More conflicts or performance concerns, mastering the art of downgrading WordPress will empower you to maintain optimal functionality and performance.
Upgrading to the latest version of WordPress is a breeze. Since version 3.7, the content management system (CMS) performs automatic updates for minor releases by default.
- Why You Might Want To Downgrade WordPress
- When Is Downgrading WordPress To An Older Version A Good Option?
- Troubleshooting Steps Before Downgrading WordPress
- How To Downgrade WordPress Manually
- Key Precautions When Manually Downgrading WordPress
- What Steps To Follow In Updating The Database After Downgrading WordPress?
- How to Transfer a Downgraded Version of WordPress Using SFTP
- What Files Should Be Deleted From The Downgraded Version of WordPress Before Uploading?
- What Files Should I Prepare Before Downgrading WordPress Manually?
- Which Method Is Recommended If You’ve Been Locked Out Of Your WordPress Site?
- How To Downgrade WordPress Automatically With A Plugin
- What Is Recommended If You Want To Roll Back To A Previous Version Of Your Plugins And Themes?
- How Can You Get Your Site Back Online By Restoring A Previous Backup?
- Do You Know Any Other Methods To Downgrade WordPress?
- Final Thoughts
For major releases, you can simply log in to the WordPress dashboardIn WordPress, the Dashboard is a central hub for managing a website's content and settings. It is the first sc... More and click the “Update Now” button at the top of your website.
But what if you need to downgrade WordPress to an older version?
In this postA post is a type of content in WordPress, a popular open-source content management system used for creating an... More, we’ll cover why you might want to downgrade WordPress, as well as exactly how to do it—both manually (in case you can’t access your dashboard), and automatically via a plugin.
Why You Might Want To Downgrade WordPress

Generally speaking, it’s best to run the latest version of WordPress on your website.
Older versions aren’t actively maintained by WordPress developers, so they are more likely to contain security vulnerabilities, as well as have conflicts with third-party themes and plugins, than the latest version.
If you recently updated WordPress to the latest version, however, and discovered that it broke your website’s functionality, you may want to downgrade.
You can always try to troubleshoot the problem by deactivating plugins and scanning files for lines of bad code, but downgrading offers a quick and easy solution, at least until you can nail down the root of the problem.
By downgrading to the version of WordPress your website was previously running, your website’s functionality should be restored.
When Is Downgrading WordPress To An Older Version A Good Option?
Wondering when it’s best to downgrade WordPress to an older version? Let’s explore the scenarios where reverting to a previous iteration of WordPress becomes a wise choice.
1. When might someone downgrade WordPress out of preference?Opting for a downgrade might be preferred if individuals find the features or operational flow of an older version more aligned with their preferences or simpler to navigate for their specific requirements.
2. When is downgrading WordPress advisable due to compatibility issues? Downgrading WordPress becomes necessary when updates result in compatibility issues with current plugins or themes, affecting the overall functionality of the website.
Troubleshooting Steps Before Downgrading WordPress
Before you decide to downgrade your WordPress core, try these troubleshooting steps. Often, the issue lies with themes or plugins rather than WordPress itself.
- Backup Your Site: Start by backing up your entire site. This ensures you can restore your content and settings if something goes wrong.
- Use a Staging Environment: If possible, create a staging environment. This allows you to troubleshoot without affecting the live site, providing a safer way to test changes and identify the root cause of the issue.
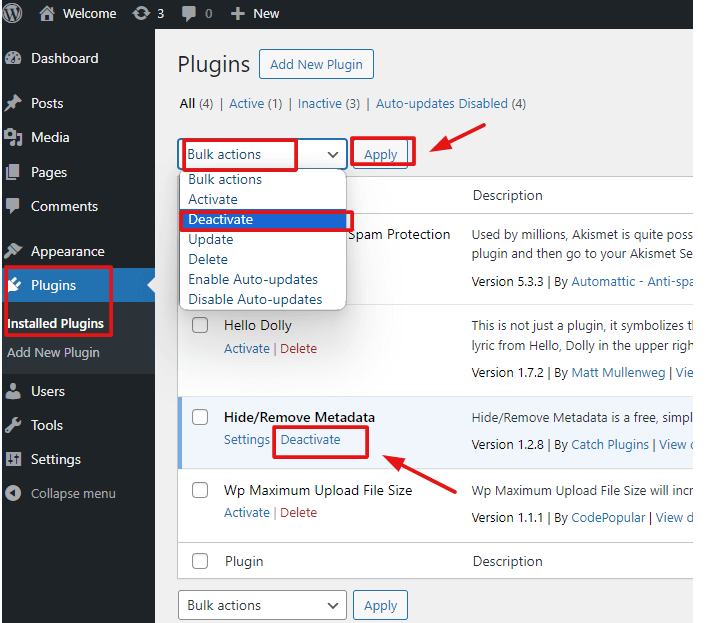
- Deactivate All Plugins: Sometimes, a plugin conflict might be causing the issue. Deactivate all plugins and see if the problem persists. If it’s resolved, reactivate the plugins one by one to find the culprit.
- Switch to a Default Theme: Themes can also cause conflicts. Switch to a default WordPress themeA WordPress theme is a set of files that determine the design and layout of a website. It controls everything ... More like Twenty Twenty-One. If this resolves the problem, the issue likely lies within your original theme.
- Ensure Everything is Up to Date: Outdated plugins and themes can create compatibility issues. Make sure all your plugins, themes, and WordPress itself are up to date. This can often resolve problems related to newer versions of WordPress.
- Review Common WordPress Errors: Check the WordPress Common Errors and FAQ Troubleshooting guides. These resources offer solutions to frequent issues and may help you resolve the problem without further intervention.
- As a Last Resort: Downgrade WordPress: If none of the above steps work, consider downgrading WordPress as a temporary measure. Remember, downgrading can expose your site to security vulnerabilities and compatibility issues, so only use it while you troubleshoot and fix the underlying problem.
By following these steps, you can address most issues without resorting to downgrading WordPress, ensuring your site remains secure and functional.
How To Downgrade WordPress Manually
We’ll first cover how to downgrade WordPress manually using FTP, which is necessary if you’re unable to access your admin area.
New to FTP? Check out our WordPress FTP tutorial here. 👈
1) Check Which Version of WordPress Your Website Is Currently Running
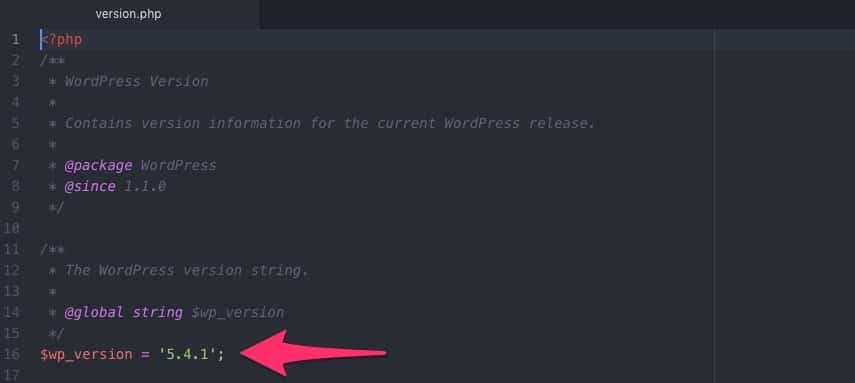
Before downgrading, check to see which version of WordPress your website is currently running. There are several ways to check the version, one of which is to open the version.php file in the wp-includes folder.
In this file, the version numbered is proceeded by the code $wp_version. If your website is running WordPress 5.4.1, for example, you’ll see $wp_version = '5.4.1' listed in the version.php file.
You can also see which version of WordPress your website is running by viewing the source code in your web browser.
Right-click on an open area of your website and select “View PageIn WordPress, a page is a content type that is used to create non-dynamic pages on a website. Pages are typica... More Source.”
With your web browser now showing your website’s source code, press Ctrl+F (Windows) or Cmd+F (Mac) and search for the word “generator.”
You should see a line like <meta name="generator" content="WordPress 5.4.1" />, which indicates that your current WordPress version is 5.4.1.

2) Download the Older Version
Now that you know which version of WordPress your website is currently running, you can download an older version with which to replace it.
The WordPress Foundation offers all major versions, including those dating back to 2007, available free to download here.
After locating your desired version, download the compressed file and extract it to your computer’s storage drive.
3) Back Up Your Website
🚨 Important Note: You should not attempt to downgrade WordPress without first backing up your website.
It’s always a good idea to back up your website when downgrading.
When performed correctly, downgrading shouldn’t affect your website’s content. With that said, you may accidentally delete the wrong file or files, resulting in the permanent loss of content.
By creating a backup, you’ll have peace of mind knowing that any mistakes made during the downgrade can be reversed.
To perform a complete backup, download your website’s MySQL databaseA database is an organized collection of data stored and accessed electronically. It is a crucial component of... More and all its static files and save them locally to your computer’s storage drive. You probably won’t need the backup, but in the event your downgrade goes awry, you can use it to rollback your website.
4) Replace Static WordPress Files
To downgrade, you’ll need to replace your website’s static WordPress files, except for the wp-config.php file and all files in the wp-content folder, with those of the older version.
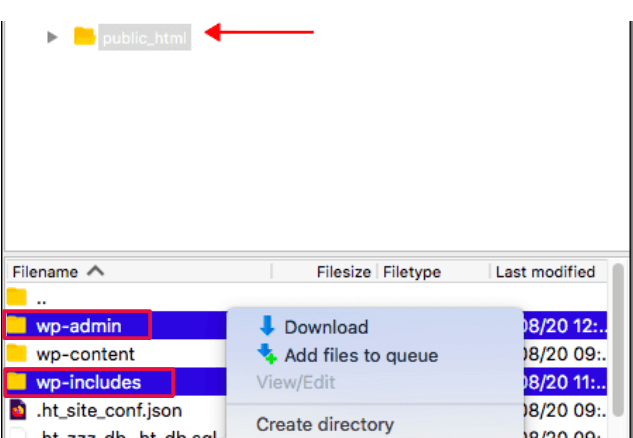
Start by connecting your website’s server with a File Transfer Protocol (FTP) client such as FileZilla and opening the folder in which your website is stored (usually public_html).
Next, highlight all the files and folders, except for the wp-config.php file and the wp-content folder, in your website’s main folder. You can then delete them by right-clicking in the FTP program’s interface and selecting “Delete.”

After deleting the appropriate static files, you’ll need to upload the static files from the older version of WordPress to your website’s server.
In your FTP program, locate and open the local folder containing the older version of WordPress. Next, upload all the files and folders, except for the wp-content folder, to your website’s main folder.
When finished, your website will run the older version of WordPress. To verify the downgrade was a success, use either of the aforementioned methods to see which version of WordPress your website is running. Assuming the older version is listed, the downgrade worked.
Don’t Delete the Wrong Folders or Files

It’s important to preserve the wp-content folder when downgrading.
This folder contains all your website’s plugins, themes and images. If you accidentally delete the wp-content folder, or if you replace it with the wp-content folder of the older WordPress version, you’ll lose these files.
In addition to the wp-content folder, you shouldn’t touch the wp-config.php file when downgrading.
This otherwise small file contains essential information about your website’s MySQL database, including the name of the database, username and password.
If you delete the wp-config.php file, WordPress won’t be able to connect to the MySQL database. As a result, you’ll see the message “Error establishing a database connection” when accessing your website rather than its actual content.
Key Precautions When Manually Downgrading WordPress
When you need to downgrade WordPress manually, it’s crucial to take several precautions to ensure a smooth, error-free process.
- Backup Your Site: The first and most important step is to back up your entire site. This includes your database, files, and any custom configurations. If anything goes wrong during the downgrade, a backup allows you to restore your site quickly.
- Use a Staging Site: Before making changes to your live site, test the downgrade on a staging environment. This helps you identify potential issues without affecting the functionality or user experience of your live site.
- Familiarize Yourself with SFTP: Manual downgrades require you to transfer files and possibly edit configurations on your server using SFTP. If you’re not comfortable with these tasks, you risk causing significant problems.
By taking these precautions—backing up your site, using a staging environment, and being familiar with SFTP—you can minimize risks and ensure a safer downgrade process.
What Steps To Follow In Updating The Database After Downgrading WordPress?
- Transfer Your Files: First, make sure all your files are correctly transferred to prevent any data loss or corruption.
- Log Back In: Use your admin credentials to log back into your WordPress site.
- Database Upgrade Request: After logging in, you may see a prompt to upgrade your database. This is a standard step following a downgrade and needs to be addressed immediately.
- Proceed with the Upgrade: Follow the provided instructions to upgrade the database. This may involve clicking an “Upgrade” button to apply necessary adjustments. And ensure compatibility with the downgraded WordPress version.
By following these steps, you’ll ensure your site remains functional and stable after the downgrade.
How to Transfer a Downgraded Version of WordPress Using SFTP
Transferring a downgraded version of WordPress via SFTP is straightforward. Here are the steps:
- Connect to Your Web Server: Use your SFTP client to log in to your web server. You’ll need your server address, username, and password.
- Navigate to WordPress Root Directory: Locate the root directory of your WordPress installation, typically named public_html or www.
- Upload Downgraded Files: On your computer, find the downgraded version of WordPress you want to upload. Select all the core files and folders, including wp-admin and wp-includes.
- Drag and Drop Files: Drag the selected downgraded WordPress files from your computer to the web server’s root directory. Ensure you overwrite all existing files in the wp-admin and wp-includes directories.
Important Tips
- Backup First: Always back up your current website files and database before performing a downgrade.
- Time Consideration: Depending on your internet speed and the size of your website, the upload process may take some time.
After the transfer is complete, double-check that all files have been correctly overwritten. This ensures your WordPress site reverts to the desired version without any issues.
What Files Should Be Deleted From The Downgraded Version of WordPress Before Uploading?
Downgrading your WordPress site requires careful preparation to ensure a smooth transition. Key to this process is deleting certain files from the downgraded version before uploading it to your server. Here’s a guide to help you:
- Delete the wp-content Folder:
- Why: This folder contains your site’s media, plugins, and themes.
- Action: Retain your existing wp-content folder to preserve your current media libraryThe Media Library in WordPress is a feature that allows users to easily upload and manage media files such as ... More, active plugins, and themes. Delete the wp-content folder from the downgraded version to avoid overwriting these critical components.
- Delete the wp-config.php File:
- Why: This file contains essential configuration details for connecting WordPress to your database.
- Action: Keep your existing wp-config.php file intact. Deleting the wp-config.php file from the downgraded version prevents the need to re-enter all your database information, which could disrupt site access.
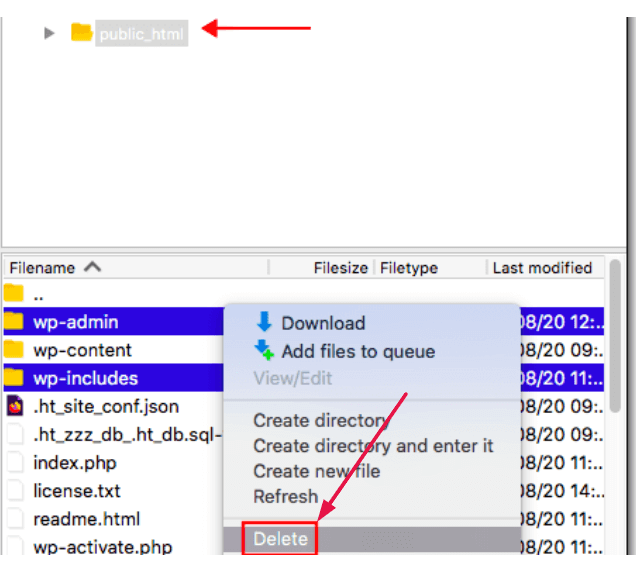
By carefully removing these files from the downgraded version, you ensure the integrity of your WordPress site during the downgrade process.
What Files Should I Prepare Before Downgrading WordPress Manually?
To manually downgrade WordPress without disrupting your website’s functionality, follow these steps:
- Exclude the wp-content Folder:
- Reason: This folder houses your site’s media, plugins, and themes.
- Action: Ensure the wp-content folder from the downgraded version is not uploaded to preserve your current site elements.
- Retain the wp-config.php File:
- Reason: It contains vital configuration data for database connections.
- Action: Keep your existing wp-config.php file to avoid re-entering database connection details, which could lead to site access issues.
- Backup Your Site:
- Reason: Safeguard against any unexpected issues.
- Action: Back up your current files before starting the downgrade process.
Following these steps ensures a safe downgrade while maintaining the integrity of your site.
What Is The Importance Of Using A Staging Environment Before Downgrading WordPress?
Using a staging environment before downgrading your WordPress site is crucial for several reasons:
- Prevent Disruptions:
- Benefit: Testing changes in a staging environment ensures your live site remains unaffected.
- Result: Any errors or issues can be identified and resolved without impacting your live site.
- Safeguard User Experience:
- Benefit: Avoid direct changes to your live site.
- Result: Minimize the risk of user-facing disruptions, maintaining a seamless browsing experience.
- Thorough Testing:
- Benefit: Conduct extensive troubleshooting and confirm effectiveness.
- Result: Ensure solutions work correctly before applying them to your live site.
- Preserve Data Integrity:
- Benefit: Avoid reductions in functionality or unforeseen crashes.
- Result: Safeguard your site’s data and integrity during the downgrade process.
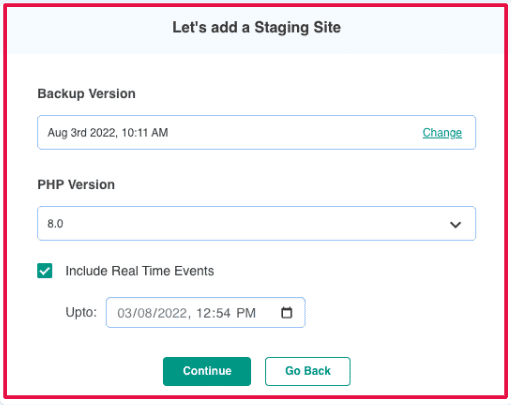
By utilizing a staging environment, you ensure that downgrading WordPress is a smooth, risk-free operation, preserving your site’s functionality and user satisfaction.
Which Method Is Recommended If You’ve Been Locked Out Of Your WordPress Site?
If you’ve found yourself locked out of your WordPress site, what’s the recommended method to regain access?
- User-Friendliness of the Manual Method: Is the manual method user-friendly or complex? The manual method is considered more complex and less straightforward compared to other available options.
- Steps Involved in the Manual Method: What does the manual method entail when you are locked out? This method involves a series of steps, including utilizing FTP (File Transfer Protocol) and uploading files to your website’s server.
- Recommended Approach for Regaining Access: What is the suggested method if you are locked out of your WordPress site? The manual method is recommended as the best approach for regaining access to your WordPress site.
How To Downgrade WordPress Automatically With A Plugin
An alternative way to downgrade WordPress to an older version is to use a downgrade plugin.
The plugin WP Downgrade, for example, lives up to its namesake by introducing a downgrade feature in the WordPress admin dashboard.
Using it, you can specify which version of WordPress you’d like to install on your website while logged in to the admin dashboard. After installing, go to Settings > WP Downgrade to use the plugin:
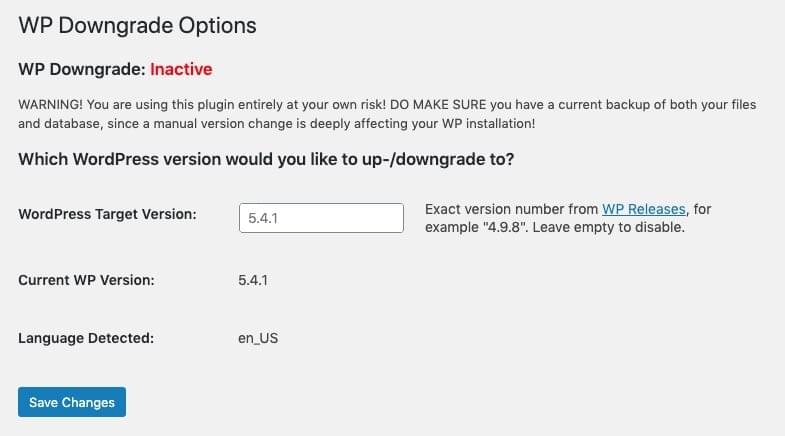
The problem with using a downgrade plugin, however, is that it requires the use of a functional WordPress admin dashboard. If you’re unable to access the admin dashboard, you won’t be able to install and run the plugin.
Maybe your entire website went down after updating WordPress to the latest version, or perhaps the admin dashboard shows a white screen. In cases such as these, you must manually downgrade by connecting to your website’s server and replacing the static WordPress files.
What Is Recommended If You Want To Roll Back To A Previous Version Of Your Plugins And Themes?
If you’re considering rolling back to an earlier version of your plugins and themes, it’s crucial to follow a detailed guide for a smooth experience. These guides simplify the process into easy-to-follow steps, ensuring you can safely revert your software without any worries about losing data or affecting your website’s performance. Before you start downgrading, remember to back up your current data to safeguard your settings and customizations. This precautionary measure ensures that you can always restore your site to its present state if necessary.
How Can You Get Your Site Back Online By Restoring A Previous Backup?
Wondering how to bring your website back online if it’s currently offline? Restoring a previous backup is a powerful solution. However, its success depends on having a comprehensive backup of your entire WordPress setup, covering everything from core files to plugins and themes. Here’s a step-by-step guide:
- Verify Your Backup: Double-check that your backup contains all the necessary components—your WordPress database, files, and any additional content.
- Access Your Hosting Control Panel: Log in to your hosting control panel, where your backup files are typically stored, especially if automatic backups are enabled.
- Restore the Backup: Most hosting services offer a simple way to restore your site from a backup. This could be through a convenient one-click restore option or manual intervention may be required.
By following these steps diligently, you can bring your site back to a previously functional state, ideally without losing any crucial data or functionality. Remember, regular backups are your website’s lifeline, providing a critical safety net in times of crisis.
Do You Know Any Other Methods To Downgrade WordPress?
1. Where can you find a guide to help you roll back plugins and themes?
Consult Online Resources and Forums: Look for comprehensive guides and expert advice on rolling back plugins and themes by exploring online resources and visiting reputable WordPress forums. These platforms are rich in valuable insights and step-by-step tutorials tailored to assist you in managing and troubleshooting your WordPress site effectively.
2. What should you do if you want to revert updates not only in WordPress but also in plugins and themes?
Refer to Detailed Guides: When aiming to revert updates not only in WordPress but also in plugins and themes, it’s essential to refer to detailed guides that offer clear, concise instructions. These guides walk you through the entire process, ensuring you accurately rollback to the desired previous versions without encountering any errors or complications.
3. If your WordPress site is down, how can you restore it using previous backups?
Restore from Complete Backups: If your WordPress site experiences downtime, restoring it to full functionality can be achieved by applying a complete backup of your WordPress core. This comprehensive backup restores your website to its previous state before any issues arose, ensuring a seamless return to optimal performance.
By utilizing these methods and resources, you can effectively downgrade WordPress, roll back updates in plugins and themes, and restore your site from previous backups, ensuring smooth operation and minimizing downtime for your website.
Final Thoughts
Downgrading your website to an older version of WordPress may sound daunting, but it’s a relatively easy process once you familiarize yourself with the steps.
You can either replace your website’s static WordPress files or use a downgrade plugin. Both methods allow you to rollback WordPress to an older version.
If you have any questions about downgrading WordPress, please feel free to leave a comment below!
If you’re looking for fast wordpress hosting as well as done-for-you updates such as downgrading your WordPress version, check out our hosting packages by clicking the button below:


